RetroEngine
RetroEngine is a software-based engine for drawing 16-bit style graphics. Although I use SDL to draw the output to the screen, the engine is built to be platform-independent.

Why I Made RetroEngine
This whole project more or less started as a coding exercise. I wanted to see if I could make an old-school 2D engine that you could use with modern C/C++ but that still has the same tiny memory and CPU footprint that an old-school engine would have.
I wanted to provide a close-to-the-metal exerience for programmers without driving them too insane. I don't really think that anybody's going to pick this up and make a real game with it (besides me making Typing Academy) but I think it would be a fun thing to play around with in your spare time.
On Limitations
There will be times as you read through this where you ask "why are there so many limitations?" It's a valid quesiton - after all with modern CPUs I could pretty much shoot the moon when it comes to 2D rendering. However, that wasn't the goal of this coding exercise. I not only wanted to minimize my memory and CPU footprint but I also wanted to design things as though I were going to implement the engine as a custom IC.
The draw routine contains no multiplication or division (everything is done with addition, subtraction, shifts, and bitwise operations). Interpreting every 0 palette entry as "transparent" means you can check for transparency with a few NAND and AND gates. Even 32-bit objects are aligned to 16-bit memory boundaries.
Several operations are dependent on one-bit flags, which in hardware would just be routed directly to AND and NAND gates to select this output or that output. For example, here's a circuit diagram that shows a quick and dirty way to implement the flip x and flip y flags in tilemaps. Notice, there's no if/then statement and there are no additional clock cycles spent calculaing this when you implement it in silicon.
How It Works
To understand RetroEngine it helps to build up from its smallest data structures up to its largest structures.
Palette Memory
RetroEngine stores a 256-color palette in a set of 32-bit ARGB 8888 values. This wastes some memory, and isn't how it would be stored in the old days, but it helps to simplify copying and mixing colors on modern 32-bit and 64-bit systems.
The engine understands this block of memory as 16 palettes of 15 colors (color 0 on every palette is understood to mean transparent). This means that although there are 256 entries, you can only have 241 on-screen colors.
Character Memory
Borrowing Nintendo's terminology from the NES and SNES, character memory stores a collection of 8x8 pixel images from which you can build your screen. RetroEngine has only one color mode: 4 bits-per-pixel (or 2 pixels per byte).
This whole setup hews very closely to how the SNES memory works so it can get a little confusing.
Character Memory is laid out as rows of 16 characters. This means that while each row of a character is 4 bytes wide, the second row of a character is 128 bytes after the first row.
This may seem odd, but there are two major benefits. First, it helps when drawing sprites that are multiple tiles tall. Second, it means that you can use popular SNES sprite editing tools, like YY-CHR.
RetroEngine has storage for 1024 characters (laid out as a 16x64 character grid).
Tiles
Now that we've got our very basic data down, it's time to get into the more abstract stuff. A tilemap is a giant grid of tiles, which is a data structure that combines one character with some additional information.
Typically a game's background will be made using a tilemap.
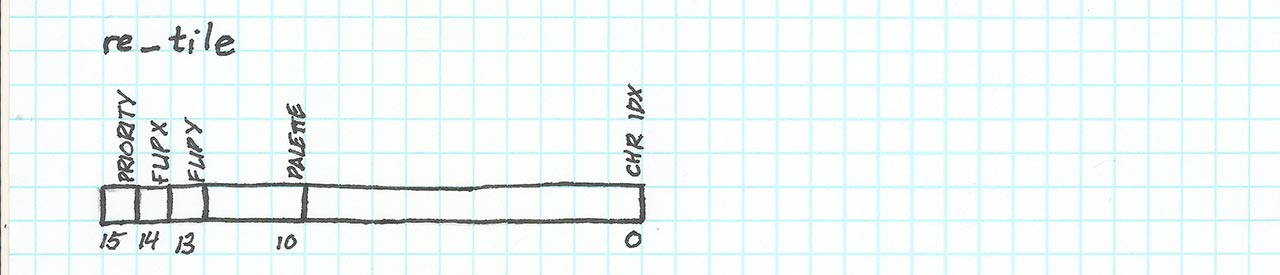
RetroEngine stores tiles in a 16-bit unsigned integer.
- bit 15: priority whether the tile should show in front of or behind sprites
- bit 14: flip x flips the tile horizontally
- bit 13: flip y flips the tile vertically
- bits 12-10: palette which palette the tile uses. Since this is only 3 bits, tilemaps can only use palettes 0-7
- bits 9-0: chr index which character to draw in this position
You can change the size of your tilemap by changing the constants in RetroEngine.h but RE_TILEMAP_SIZE_X and RE_TILEMAP_SIZE_Y must be powers of 2. By default, they're set to 64x64 characters, giving you a total pixel size of 512x512.
You can use the macro re_make_tile to streamline this whole process.
Sprites
A sprite is an object made of one or more characters that can be positioned anywhere on the screen. Where tilemaps are usually used for backgrounds and environments, sprites are usually used for things that move around the scene (like character, projectiles, etc ...).
In order to compact things as much as possible, the information for each spite is stored in two objects.
![]() (You don't have to know the specifics, since there's a convenience function to pack this data for you.)
(You don't have to know the specifics, since there's a convenience function to pack this data for you.)
re_sprite.data is a 32-bit unsigned integer
- bits 31-27: unused
- bit 26: enable turns the sprite on and off
- bits 25-16: chr index the top-left character of the sprite
- bits 15-14: width how many characters wide
- bits 13-12: height how many characters tall
- bit 11: unused
- bit 10: flip x flips the sprite horizontally
- bit 9: flip y flips the sprite vertically
- bits 8-0: y pos vertical position on screen
![]()
re_sprite.exdata is a 16-bit unsigned integer
- bits 15-12: palette which palette to draw with
- bits 11-10: layer which layer the sprite is on
- bit 9: priority whether the sprite should draw above the tilemap
- bits 8-0: x pos horizontal position on screen
The sprite's X and Y position are offset by 32 pixels in each direction so that the sprite can be drawn off the top and left sides off the screen.
If the priority bit is set to 0, the sprite will always draw over the tilemap, even if the tilemap is set to priority 0.
The sprite data structures are a bit much to deal with, so use the convenience function CRetroEngine::SetSprite to streamline the process.
By default, RetroEngine allows for 256 sprites.
Layers
RetroEngine uses 4 layers to hold tilemaps and sprites. There are four layer entries that you can set using CRetroEngine::SetLayer.
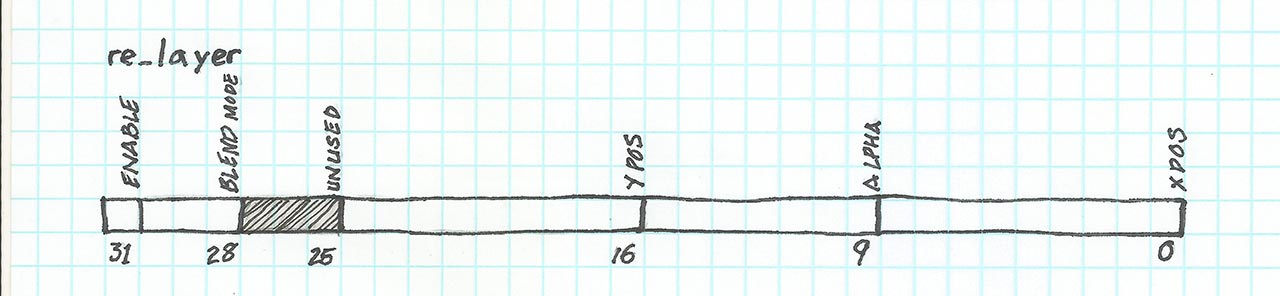
re_layer is a 32-bit unsigned integer
- bit 31: enable turns the layer on and off
- bits 30-28: blend mode layer 0 has options for blending it with lower layers
- bits 27-25: unused
- bits 24-16: y pos the layer's vertical scroll position
- bits 15-9: alpha a value used for blending layer 0
- bits 8-0: x pos the layer's horizontal scroll position
The Draw Cycle
Now that you've seen the data structures at play in RetroEngine, and you've learned a bit of the terminology, it's time to talk about how the draw cycle functions.
I wanted to design this engine to function as similarly to a real 16-bit game console as possible, so instead of using GPU-friendly forward-rendering techniques, the engine virtually scans down the screen the way a CRT raster scan would and at each pixel it generates a color.
Pre-draw
At the top of the screen, before the scanline begins drawing, the draw function copies sprites into local memory and sorts them by layer, then priority, then x position.
This may seem like it would be complicated, but it's actually very simple because of the way our memory is organized. Layer, priority, and x position are stored in that order in re_sprite.exdata, so with a simple bitwise mask we can sort based on that integer alone.
Iterating Through Scanlines
Before drawing each scanline, the draw function calls an hBlank callback function - intended to simulate the hBlank interrupt in 16-bit hardware. This enables all sorts of common line-scrolling and paralax effects.
Note that because the sprites have been copied and sorted already you cannot make changes to sprites in the hBlank interrupt.
Determining Pixel Color
This can go one of two ways depending on whether or not blending is enabled for Layer 0.
Without blending, the engine will iterate through each pixel on the scanline and for each pixel it will iterate through each layer.
For each layer it will:
- see if the layer's enabled
- try to get the layer's tilemap color and priority
- try to find a sprite color
- use transparency and priority to choose between the two
If it finds a non-transparent color, it will draw that to the screen and move on to the next pixel. If not, it'll move on to the next layer.
If all of the layers end up being transparent, the first color in palette memory will be drawn.
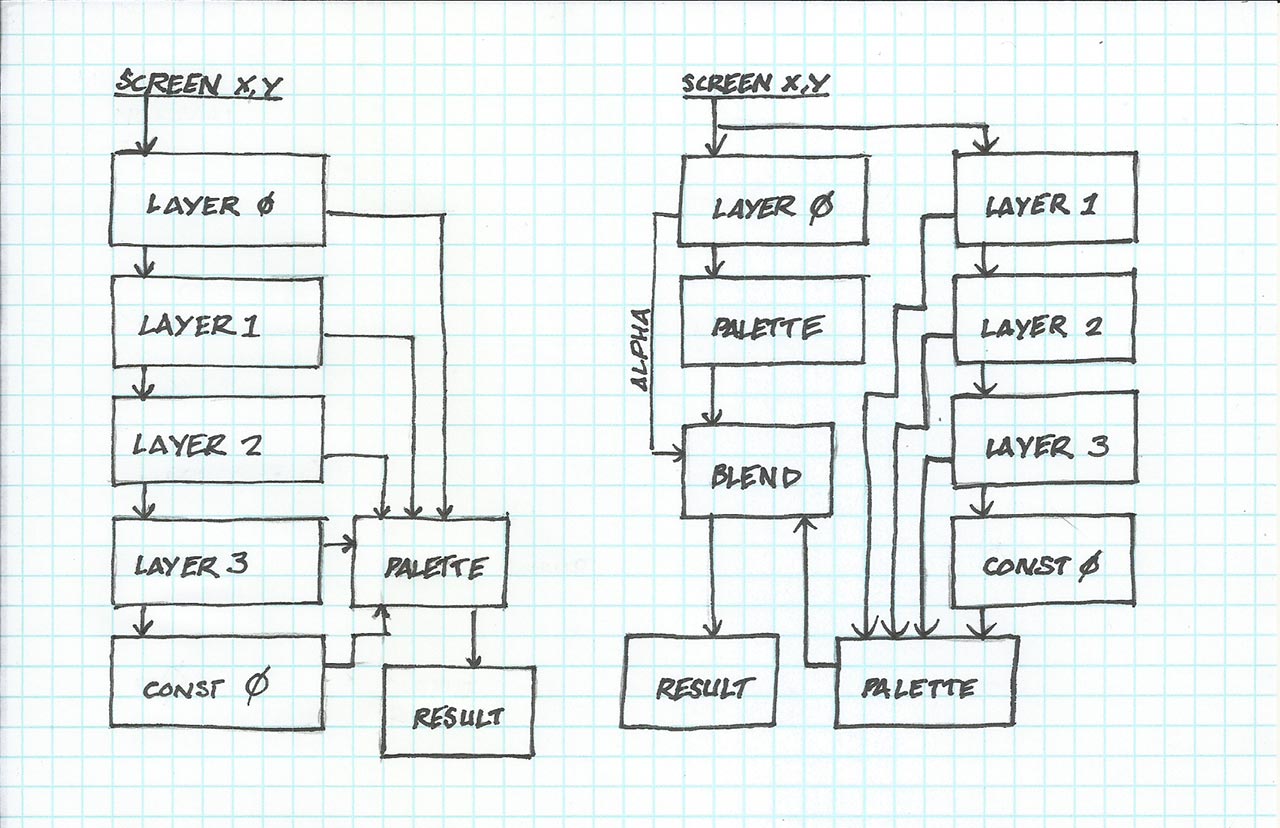
If blending is enabled on Layer 0, the engine will get two colors: a color for layer 0 and a color for all of the other layers.
It will then look up those colors in the palette as RGB values. Last, it'll use Layer 0's alpha value and blend mode to blend the two colors together.
Sprite and Tile Priority
So far it should be pretty straightforward to understand that what's on Layer 0 always shows on top of what's on Layer 1, and so on down the line. But what about when priority comes into play?
Well, the good news is that layer order takes precedence. Layer 0 will still always show on top of Layer 1, no matter what the sprite or tile priority is.
Within the layer, though, you can use priority to make certain things appear above others. This lets you do things like make sure the player character shows up in front of enemies, or have certain tilemap tiles (like bushes or trees) show up in front of the character.
In order from front to back:
- priority 0 sprites
- priority 0 tiles
- priority 1 sprites
- priority 1 tiles
Memory Footprint
One of the goals with this engine was to create a 2D graphics engine with a minimal memory footprint. Some of this was a knee-jerk reaction to Unity games that take up several hundred MB of memory just to look like an SNES.
(As an aside, I understand why it's done - that expanding these assets to RGBA 8888 and uploading them to the GPU enables a world of advanced drawing techniques - but this is just creative grist for the hobby programming mill.)
Here's how things stack up.
| Item | Size |
|---|---|
| Palette | 1024 B |
| Character Memory | 32768 B |
| Tilemaps | 32768 B |
| Sprites | 1536 B |
| Sprite Sorting | 1536 B |
| Layers | 16 B |
| Total | 69648 B |
69 KB is incredibly small for a current engine and, just to put a fine point on it, the memory footprint more than doubles when you take into account the size of the virtual screen you have to keep around (SNES resolution of 256x224 at 4 bytes per pixel comes out to 224KB).
This is maybe a nonsensical goal. Any modern game you build in SDL is going to take up several MB of memory just to set up blitting buffers and various OS hooks. However, I'm pretty proud of how slim this part of the engine is.
Caveats and Notes
The first caveat is something I mentioned above, but it bears repeating - sprites are copied into a separate space for sorting at the start of each frame. If you make changes to the sprites during the hBlank callback, those changes won't take effect until next frame.
Another repeat: tiles only have 3 bits of storage for palettes, so they can only use palettes 0-7. This is a bit of a limitation (and means you can only use up to 121 colors in your backgrounds) but if you plan ahead in your design phase this shouldn't be too much of a problem.
There are several constants in RetroEngine.h that you could change, but that you shouldn't unless you're up for a bit of programming.
RE_NUM_LAYERS is set to 4 and you could theoretically set it higher - but re_sprite.exdata only has 2 bits for storing a layer number, meaning you wouldn't be able to put any sprites on layers after Layer 3.
You can set any width or height for the output image, but bear in mind that at 64 tiles wide, the tilemaps will only span 512 pixels. You can safely increase the tilemap resolution to 1024x1024, but there are only 9 bits for sprite position so you can only move the sprites to cover most of a 512 pixel screen. Unless you want to do serious work changing how the engine computes sprite positions, your realistic upper bound for screen resolution is 480x270 (which integer scales to 1080p displays). It's also a good fit for 320x240 (VGA Resolution), 320x180 (which integer scales to both 720p and 1080p), 256x224 (SNES) and 240x160 (Gameboy Advance).
CRetroEngine::SetHBlank takes two parameters - a function to call on each hBlank and a void pointer. The void pointer can be null, if you're not going to use it, but if you're working with classes and C++ structures you're going to need it if your hBlank is a member function.
class myClass {
    CRetroEngine *re;        // save a local copy of a pointer to the engine
    void myHBlank(CRetroEngine *re, int scanline);
}

void myClassHBlank(CRetroEngine *re, int scanline, void * payload) {
    myClass *temp = (myClass *)payload;
    temp->myHBlank(re, scanline);
}

// and then later, in your drawing routine
this->re->setHblank(myClassHBlank, this);
Tilemaps repeat horizontally and vertically. If you move your tilemap left forever and ever it'll just loop. This is intentional behavior as it makes paralax backgrounds much easier to generate.